
Polymeric sand washout usually comes down to 4 things: the joints were not fully dry, the sand was not compacted deep enough, the activation water was off, or rain hit before the binders cured. In a rainy climate like the Lower Mainland, the best “fix” is a rain-aware process, plus drainage that keeps fast runoff from cutting through your joints. If you’re seeing washout on a driveway, it also helps to understand how interlock and paver driveways are built to shed water and stay locked in over time.
This guide is for homeowners who are tired of re-sanding after every storm. You’ll learn what causes polymeric joint sand to fail, what installation details matter most in wet weather, how to repair washed-out joints, and when the real issue is drainage or movement under the pavers.
The 60-Second Checklist To Prevent Polymeric Sand Washout
Use this quick list to sanity-check your plan before you open a bag of polymeric sand. Most washout problems can be traced back to one or two missed steps here, especially when the weather turns.
- Pick a truly dry window (including shaded areas that dry slowly).
- Make sure pavers and joints are fully dry before sanding.
- Sweep sand into joints in lifts and compact multiple passes.
- Top up and compact again until joints are consistently full.
- Remove all dust and haze before activation.
- Activate with a controlled mist, not a heavy spray.
- Keep water off the surface until the product has cured (including runoff from downspouts).
If any step feels rushed, the most cost-effective move is to pause and wait for better conditions. In rainy seasons, timing is often the difference between a 10-year joint and a 10-week joint.
Why Polymeric Sand Washes Out In Heavy Rain
Washout looks simple, but it usually has a few causes stacking up. In rainy climates, small installation issues show up faster because the joints get challenged more often, and the cure windows are harder to protect.
The good news is that you can prevent most failures by treating polymeric sand like a system: dry joints, correct depth, correct activation, and a surface that sheds water calmly.
It Was Installed While The Joints Were Damp
This is the most common rainy-climate problem. Pavers can look dry on top but still hold moisture in the joints, especially in shaded areas, along fences, or where airflow is limited.
If the joints are damp, the polymers do not bind evenly. Instead of hardening through the full depth, the sand can crust near the top and stay weak underneath. The first heavy rain then breaks the crust and pulls material out.
The Joints Weren’t Compacted Full-Depth
Polymeric sand needs to be packed into the joint, not just swept over it. When you only fill the top portion, you get a “bridge” that hides voids underneath. Those voids become pathways for water, and water movement is what starts joint erosion.
Compaction matters even more on driveways. Vehicle loads create vibration and micro-movement. If the joint was never properly packed, the sand loosens faster, and rainfall finishes the job.
Activation Was Off (Too Much Water Or Too Little)
Activation is not the same as soaking. Under-watering can leave polymers inactive below the surface, and over-watering can wash binders out of the joint before they set. Both problems can look identical after the first major rain.
In wet climates, people often overcorrect by “making sure it’s wet enough.” A controlled mist, applied in passes (per the product instructions), is usually safer than a heavy spray that floods joints and pushes sand out.
Rain Hit Before Cure
Even a perfect install can fail if rain arrives too early. Many polymeric sands need a dry cure window that can range from about 24–48 hours, depending on product, temperature, and humidity. Always follow the specific instructions on the bag because cure requirements vary.
If rain hits before the binders set, you can get surface crusting, joint channels, and sand that looks hardened in spots but washes away in others. In the Lower Mainland, this is why the forecast matters as much as the technique.
Water Management Is The Real Culprit
If water is directed across your pavers, polymeric sand becomes a wear item. Downspouts dumping onto a driveway, a slope that carries runoff over joints, or a low area that ponds water will all accelerate washout.
Before you blame the sand, trace where water is coming from and where it goes during storms. Small drainage changes can make polymeric sand last far longer than switching brands.
Rainy Climate Reality Check For Greater Vancouver
Greater Vancouver gets long stretches of wet weather where drying is slow, and “rain-free” is harder to guarantee. That doesn’t mean polymeric sand is a bad choice here. It just means you need to plan installs and repairs around real cure windows, not convenience.
If you are trying to schedule work in fall or winter, assume shaded areas will stay damp longer, and overnight dew can undo a day of drying. Building a buffer into your schedule is often the simplest way to prevent washout.
Why Timing Matters Here
In Vancouver, late fall and winter are typically the wettest periods, and that shortens your workable windows for jointing and curing.
Even in spring, a few showers can be enough to compromise fresh joints if rain hits before cure. When you plan around the forecast and give the surface time, polymeric sand is far more predictable.
The Best Times To Re-Sand And Re-Joint
For most homeowners, late spring through early fall offers the most reliable dry windows. You also tend to get warmer temperatures, which helps curing, and longer daylight, which helps the surface dry evenly.
Microclimates matter. North-facing driveways, areas under trees, and tight side yards can stay damp even when the rest of the property feels dry. Plan for those slow-drying zones, or you’ll end up with “spot washout” that repeats in the same places.
When Polymeric Sand Is A Good Idea (And When It Isn’t)
Polymeric sand is popular for a reason. It can harden joints, reduce erosion, and cut down on the amount of sand you need to top up over time. In rainy climates, it can also help resist minor runoff and reduce how easily joints get disturbed by routine sweeping.
However, it works best when the rest of the hardscape is built to manage water. If the surface funnels runoff across joints, polymeric sand becomes a temporary patch instead of a long-term solution.
Good Candidates In Rainy Climates
Polymeric sand is usually a good fit when the surface has consistent slope, water exits cleanly, and joints are within the product’s recommended width and depth. Patios with good grading and walkways with proper edging often perform very well with polymeric sand.
It also shines where you want a cleaner finish and fewer touch-ups, as long as you are willing to do the install correctly and protect the cure window from rain and runoff.
Situations Where Polymeric Sand Often Struggles
Steeper driveways and areas that take direct runoff are common trouble spots. Downspouts that discharge onto pavers, garage transitions that trap water, and low spots that pond during storms can all create repeated washout.
If your joints keep failing in the same section, treat that as a clue. The problem is usually localized water flow or movement, not the entire surface.
Alternatives To Consider
Traditional joint sand is easier to touch up and more forgiving in wet weather. It may need more frequent maintenance, but it can be a better option if you cannot guarantee cure windows or if you expect heavy runoff until drainage is corrected.
Another “alternative” is not a different sand at all. It’s improving drainage, regrading a section, or correcting edge restraint so the joints stay tight. Those fixes usually pay off regardless of which jointing sand you choose.
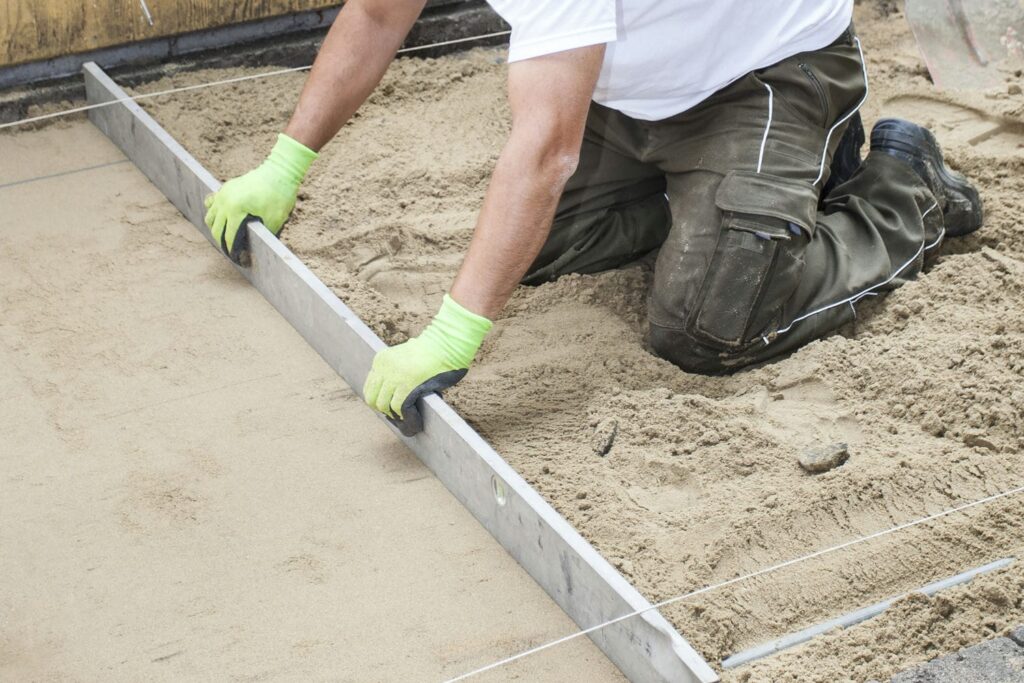
Step-By-Step Rain-Resistant Installation
If you want polymeric sand to hold up in rainy weather, treat installation like a checklist and don’t skip steps. Most failures are not because the product is “bad.” They happen because joints were damp, underfilled, or overwatered, then rain arrived at the worst time.
The steps below are written to help you avoid the most common rainy-climate mistakes. Always confirm the specific product requirements you’re using because water volume and cure time differ between brands.
Step 1: Choose The Right Weather Window
Start by selecting a window that stays dry long enough for curing, not just sanding. It’s also worth thinking about overnight moisture. In some seasons, dew can be as problematic as rain, especially in shaded areas with poor airflow.
If the forecast is unstable, it’s usually better to wait. Re-doing polymeric sand after washout costs more time and money than delaying by a few days.
Step 2: Clean And Dry The Joints Properly
Clean joints are non-negotiable. Old sand, organic debris, and fines prevent proper bonding. If you’re repairing a washout area, remove loose material until you reach stable, clean joint depth.
Drying is the part people underestimate. In rainy climates, give the surface time to dry fully, including the bottom of the joints. If the pavers look darker in certain areas, or the joint lines feel cool and damp, keep waiting.
Step 3: Sweep In Polymeric Sand In Lifts And Compact
Sweep the sand diagonally across the pavers so it fills joints evenly. Then compact the surface. Compaction helps the sand settle deeper, which is what prevents voids that later turn into washout channels.
Plan to sweep, compact, top up, and compact again. On driveways, this matters even more because load and vibration punish shallow joints. A properly packed joint lasts longer and feels more solid underfoot and under tires.
Step 4: Remove All Dust And Haze Before Activation
Before you add water, remove haze from the paver faces. Dust left on the surface can turn into residue, and it can also weaken joint performance near the top if polymers bind where they shouldn’t.
A careful sweep or a blower is often enough, depending on the paver texture. The key is to keep the sand in the joints while clearing the surface cleanly.
Step 5: Activate With A Controlled Mist
Activation should look like a fine mist, applied in passes. You want water to penetrate the joint without flooding it. If you see sand moving, you’re applying too much force or too much water.
Work methodically and follow the product’s guidance for how many passes to apply. In rainy climates, it’s tempting to “seal it in” with more water. In practice, controlled misting is usually the safer path.
Step 6: Protect The Surface Until Cured
Once activated, keep foot traffic and vehicles off until curing is complete. Also keep runoff away from the surface. That includes downspouts, irrigation overspray, and water that flows from higher areas of the driveway.
If you must protect the surface in uncertain weather, use a cover approach that avoids trapping moisture against the pavers. The goal is protection with airflow, not a sealed humid environment.
Drainage And Edge Details That Stop Washout
If polymeric sand is repeatedly washing out, drainage and edges deserve a closer look. Even perfect jointing can fail when water speeds across the surface or when pavers move slightly under load.
Think of polymeric sand as a finishing layer that performs best when the hardscape underneath is stable, and water exits smoothly.
Slope And Runoff Basics For Pavers
Pavers should shed water consistently so it doesn’t concentrate into streams. If runoff has to cross a long stretch of joints, it will eventually erode the easiest path, especially during intense rain. Pay attention to downspouts and roof runoff. If water is directed onto the pavers, redirecting it can dramatically improve joint life.
Edge Restraints Are Not Optional
Edge restraints keep pavers from spreading and joints from opening. When edges fail, pavers can shift, and that movement breaks the sand bond. Once that happens, rain and traffic quickly remove joint material.
Edges matter on walkways, patios, and driveways. If you’re seeing washout along the perimeter, or if border pavers feel loose, edge restraint is one of the first things to inspect.
Base And Bedding Layer Factors That Show Up As Washout
Sometimes washout is not erosion. It’s a symptom of movement. If a base has soft spots or poor compaction, pavers can settle, tilt, or “pump” under load. The joint sand cracks and loosens, then washes away.
If you suspect base issues, it’s worth getting the full system checked. Many walkway and joint problems tie back to how the path was built, which is why natural stone walkways need stable bases and clean drainage paths to stay tight and safe.
How To Fix Washed-Out Joints Without Rebuilding Everything
Not every washout requires lifting pavers. Many repairs are straightforward if the base is stable and the water path is controlled. The key is to be honest about what failed: the sand, the process, or the site conditions.
Start small if the symptoms are small, but don’t ignore repeat failures. Repeated washout is rarely fixed by adding more sand.
When A Simple Top-Up Works
A top-up can work when joint loss is minor, the pavers are stable, and the area is not taking heavy runoff. In that case, your focus is on clean, dry joints, careful compaction, and a protected cure window.
This is often the right approach for small patio sections or protected walkways where joints have worn gradually, not failed all at once.
When You Need To Remove And Redo The Joints
If the existing polymeric sand is crumbling, patchy, or contaminated with dirt and organics, you usually get better results by removing it and redoing the joints properly. Otherwise, the new sand bonds inconsistently and fails again.
Red flags include joints that scrape out easily, persistent soft spots, or a surface crust that breaks apart under light pressure. These all suggest the joint is not sound through its full depth.
When You Need A Drainage Or Reset Plan
If water visibly flows across the surface during storms, or you see ponding in low spots, a drainage plan comes first. You can install polymeric sand perfectly and still lose it if runoff scours the joints every time it rains.
A reset plan may also be needed when pavers rock, sink, or shift. In those cases, the joint sand is not the primary problem. It’s the messenger telling you something underneath needs attention.
When To Call A Pro
Some washout issues are easy to solve with better timing and technique. Others are symptoms of a deeper build problem. If you’ve repaired the joints once and the same area fails again, it’s worth getting a second set of eyes on the whole system.
A professional assessment is also a good idea when the area is a driveway. Driveways see heavier loads, and small base or edge issues show up faster.
Signs The Problem Isn’t The Sand
If pavers rock underfoot, sink in one section, or create a new low spot, the joint sand is not the main issue. It’s reacting to movement. Washout that follows visible water channels is another sign the issue is runoff, not sand quality. You should also take recurring perimeter washout seriously. Edges are where restraint, grading, and water exposure meet, so problems tend to show up there first.
What A Proper Assessment Includes
A good assessment looks at joint depth, joint condition, and whether the sand failed by erosion or by movement. It also checks slope, runoff sources, and where water exits during heavy rain. If adjustments are needed, the plan should be clear and organized, not guesswork. When you can see what’s happening, you can fix it once and enjoy the space instead of chasing repairs.
Get Washout Solved Before It Starts
If you want to avoid washout from the start, Umbrella Constructions builds hardscapes the right way. That means proper base preparation, correct grading to move water away from joints, and clean edge restraint so everything stays locked in long term.
Umbrella Constructions builds hardscapes the right way with fixed-price contracts, a detailed build schedule, and structured updates with progress photos so you always know what’s happening and what’s next. For driveway projects, check out our interlock and paver driveway installation services.
FAQs
How Long Does Polymeric Sand Need Before It Can Rain?
Many polymeric sand products need a dry cure window that can range from about 24–48 hours, depending on temperature, humidity, and the specific product. Read the bag instructions and plan a buffer in rainy seasons so unexpected showers don’t hit fresh joints.
Can I Install Polymeric Sand If The Pavers Are Slightly Damp?
No. Damp joints are one of the most common causes of weak bonding and early washout. In shaded areas or cool seasons, pavers can hold moisture longer than you expect, so wait until the surface and joints are fully dry.
Why Did My Polymeric Sand Wash Out After The First Heavy Rain?
The usual causes are rain before cure, joints that were not compacted and filled to full depth, or activation water that either flooded the joints or did not penetrate them. A recurring failure in one spot can also point to localized runoff.
Do Wider Joints Make Washout More Likely?
They can. Polymeric sands are designed for certain joint widths and depths. If the joints are outside the recommended range, the sand may not lock in properly, especially under heavy rainfall and runoff.
Can I Just Add More Polymeric Sand On Top Of The Joints?
Sometimes, but only if the joints are clean, dry, and stable. If the existing polymeric sand is crumbling, contaminated, or failing below the surface, you usually get better results by removing the weak material and redoing the joints properly.
Should I Cover My Pavers After Installing Polymeric Sand?
Covering can help if rain is a risk, but it needs to protect the surface without trapping moisture against the pavers. The safest approach is still choosing a reliable dry window and keeping runoff away until curing is complete.
Is Polymeric Sand A Good Choice For A Sloped Driveway In Heavy Rain?
It can be, but slopes increase runoff force. If water sheets down the driveway or concentrates in channels, washout can repeat even with correct jointing. In those cases, controlling the water path is step one, then re-jointing is step two.